

How to Perform a Cash Bank Transfer at an ATM
While Japan is mostly cash-based, large payments for things like rent are often handled at an ATM through a bank transfer. These transfers usually require a Japanese bank account. If you do not have such an account (i.e., you are not a Japanese resident), they can be made using cash at many Mizuho Bank ATMs. If your housing is provided through Oakhouse during participation in our program, you may need to pay rent from your housing stipend using this method. Most Mizuho ATMs with the cash transfer option will have an option to perform the transaction in English. If you use an ATM from an alternative bank, encounter an ATM without the English option, or simply have questions about the process, you can refer to this guide for further details.
Update:
Since the time this article was originally posted, Oakhouse has changed its payment system to use Pay-easy. Pay-easy is a free payment system which allows you to pay in cash at major Japanese Bank ATMs. Please see our guide on how to use Pay-easy to make cash payments.
Important Notes
Fees are typically charged for cash transfers, usually about ¥250 in addition to the transfer, though it may vary. Please keep these possible fees in mind when preparing cash for a transfer.
Bank transfers are typically received the day after submission. Also, payments made after business hours (typically after 3 PM) will not be submitted until the next day and may incur an additional fee.
MUFG/UFJ Bank ATMs also provide cash transfer services, but are only available in Japanese.
ATMs can only perform cash transfers for ¥100,000 or less. For transfers larger than this, please see a bank teller for assistance.
Required Information
Make sure you have the required information for the recipient account (Oakhouse will provide you with this information):
Bank (Mizuho Bank)
銀行名(ぎんこうめい)(みずほ銀行) Ginkou-mei (Mizuho Ginkou)
Branch name
支店名(してんめい) Shiten-mei
Account type (Reg./Checking)
口座科目(こうざかもく) Kouza kamoku
普通(ふつう)・当座(とうざ) Futsuu / Touza
Account number
口座番号(こうざばんごう) Kouza bangou
Recipient name
口座名義(こうざめいぎ) Kouza meigi
Instructions for Japanese-only ATMs
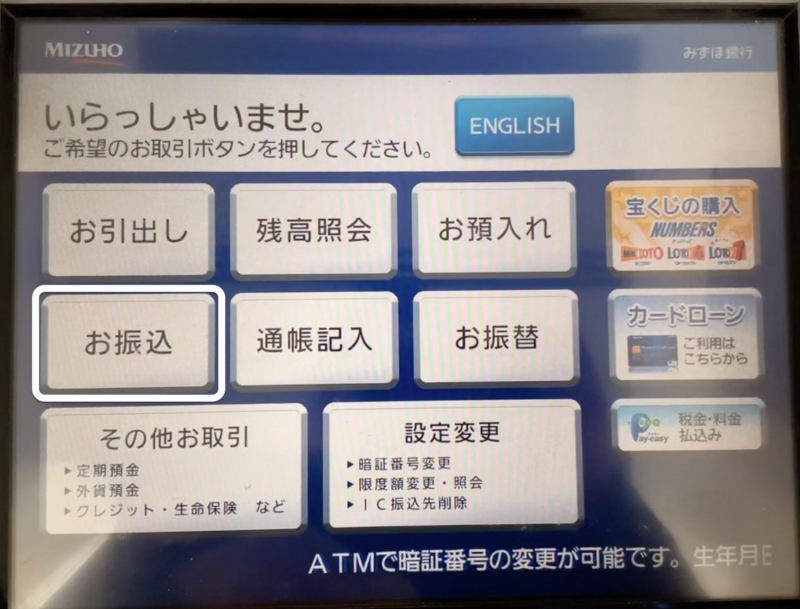
Step 1 — Begin the transfer
Select「お振込」(Transfer). If an English option is available, feel free to select it and proceed ahead. Please be aware, however, that the Transfer option is not always available in languages other than Japanese.
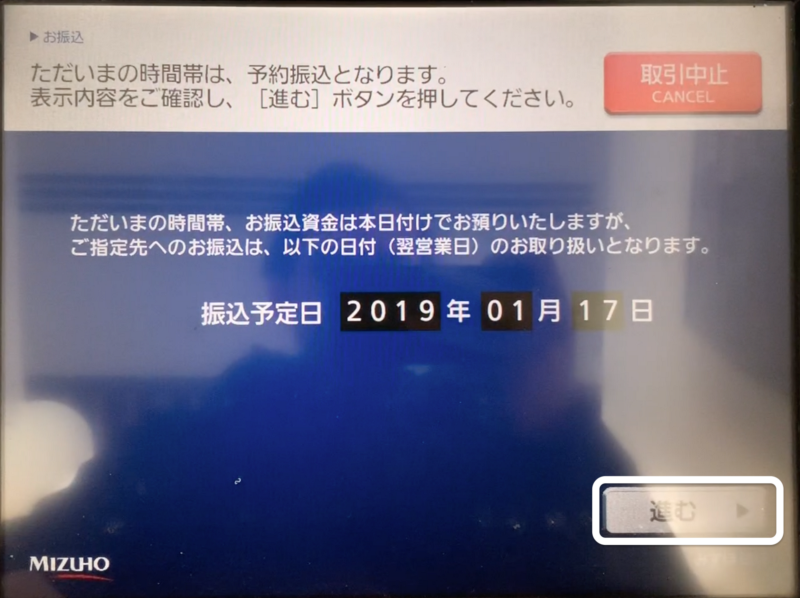
Step 2 — Confirm the transfer date
This screen may appear to tell you which date will appear on the transfer. Depending on the bank hours, your transfer may be sent the next business day. Please keep this in mind when trying to meet payment due dates. Select「進む」(Continue).
Step 3 — Confirm that you know the recipient
This screen may appear to warn you of possible fraudulent activities, such as false insurance payments, or false impersonation of a friend or relative. These types of fraud are typically not common for visitors to Japan, but please make sure you always know who you are sending money to. Please select「振込操作をつづける」(Continue transfer).

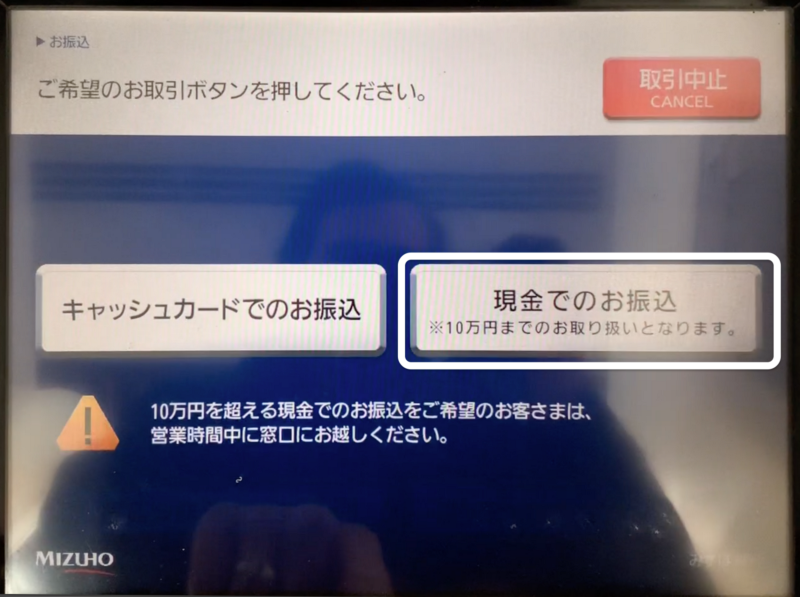
Step 4 — Select the cash transfer option
This screen will ask which method you would like to use for your transfer. If「現金」(Cash) is not available, or if you are asked to insert an ATM card, this ATM may not be able to perform cash transfers. Please find another ATM location or see a bank teller. If available, select 「現金でのお振込」(Transfer using cash).
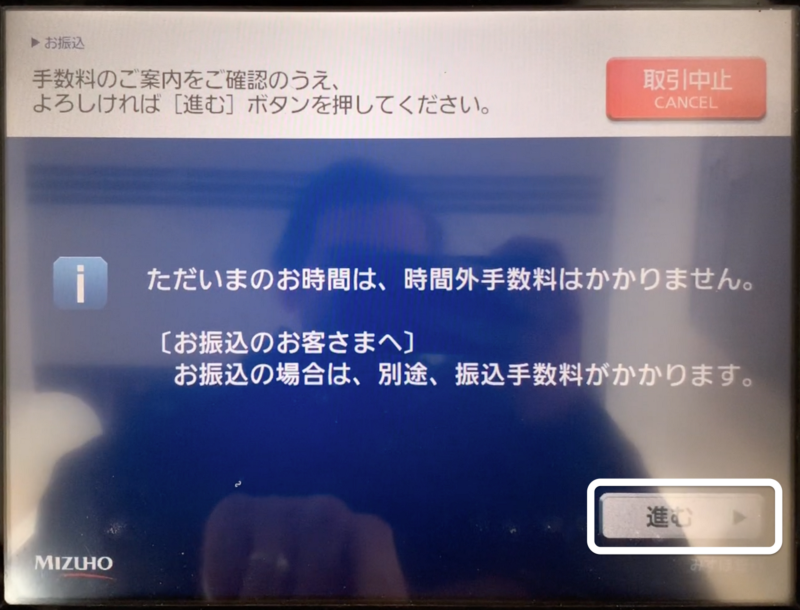
Step 5 — Acknowledge the after-hours fee
This screen may appear to inform you of whether an after-hours fee will be charged. This fee is usually no more than ¥250 as well, and will only be charged if performing a transfer after business hours.
Select「進む」(Continue).
Step 6 — Select how to input the recipient info.
If you have previously made a「振込カード」(Transfer card), you can select that option to input the information. Otherwise, select「振込先指定」(Enter recipient) to enter the recipient information manually.

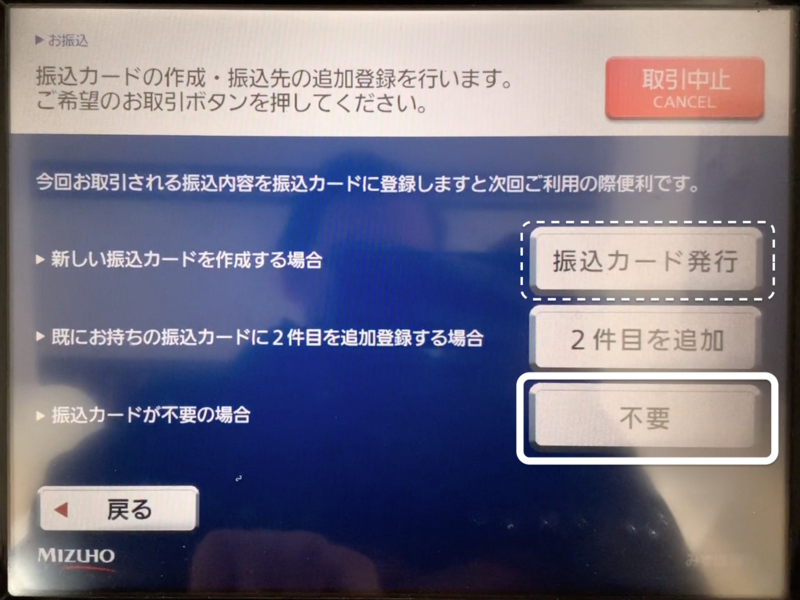
Step 7 —Decide whether or not to create a transfer card
If you would like to make a transfer card for this recipient to make it easier to repeat this process in the future, you can do so by selecting「振込カード発行」(Create transfer card). The steps in this guide will not create a transfer card, but the process should be very similar. To continue without creating a transfer card, select「不要」(No).
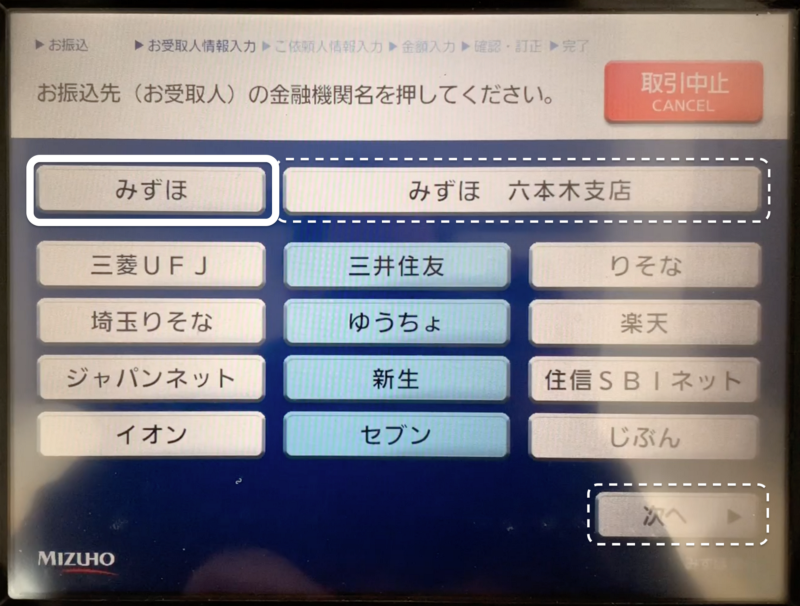
Step 8 — Select the recipient’s bank
For the purposes of this guide, we will send our transfer through 「みずほ」(Mizuho Bank). At bank branches, the ATM will include a button listing the bank and branch name. If this branch matches the recipient bank and branch, you can select this button. Otherwise, you can either select 「みずほ」(Mizuho) to send through Mizuho Bank, or「次へ」 (Next) to search for the bank name if the recipient account is held at another bank.
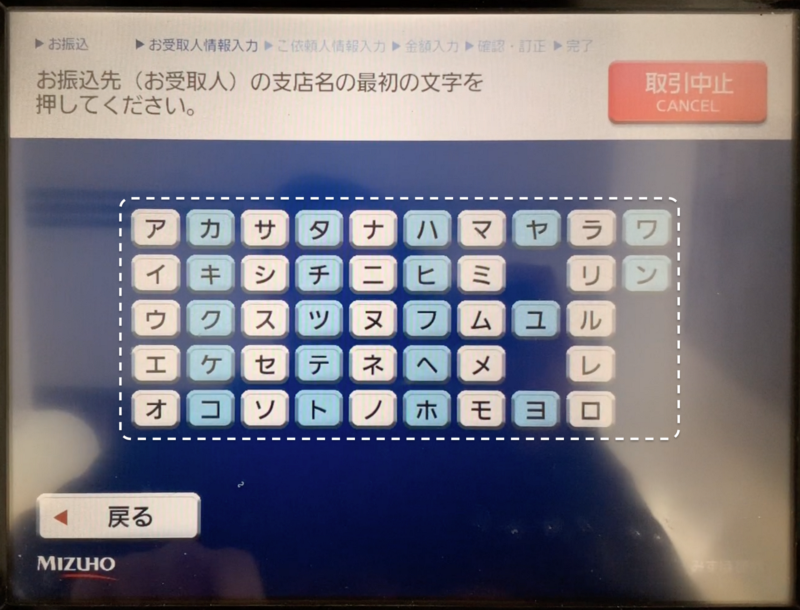
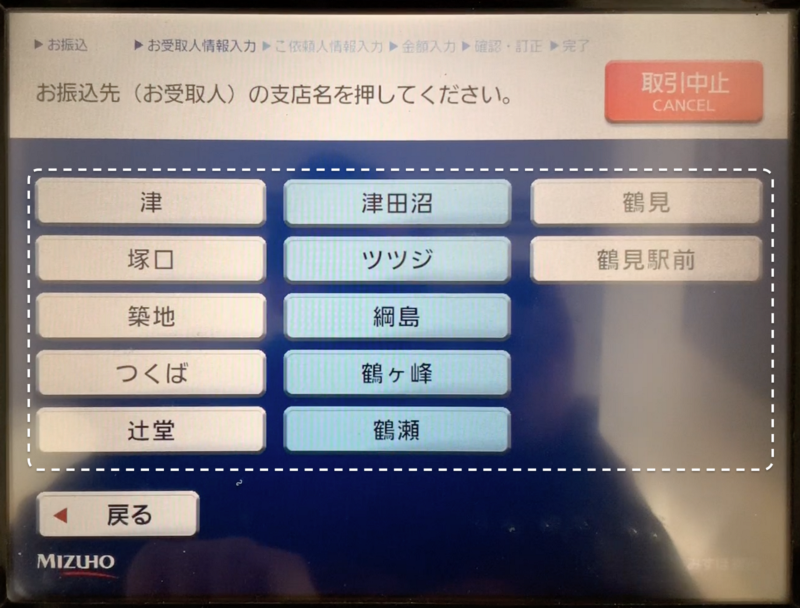
Step 9 — Search for the recipient’s branch name
This screen will list the Japanese katakana. If your branch name is written in katakana, simply select the first katakana of the name on this screen to continue. If your branch name is written in hiragana or kanji, please inquire with Oakhouse/the recipient for the proper katakana spelling of their branch name, and then select the first katakana of the name to continue.
Step 10 — Select the recipient’s branch
To continue, select the branch name that matches that of the recipient. If the branch name does not appear on this list, please confirm that you have selected the correct beginning katakana of the branch name on the previous screen. More than one page may appear.
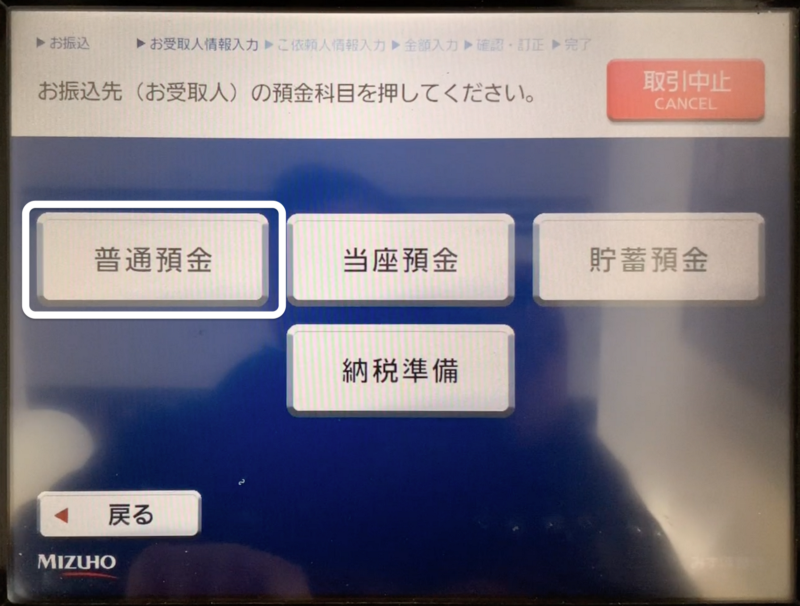
Step 11 — Select the recipient’s account type
This screen will prompt you to select the account type of the recipientʼs account. In the majority of cases, it will be a regular account. If so, please select「普通預金」 (Regular account) to continue. Otherwise, please select the account type which matches the recipientʼs account.
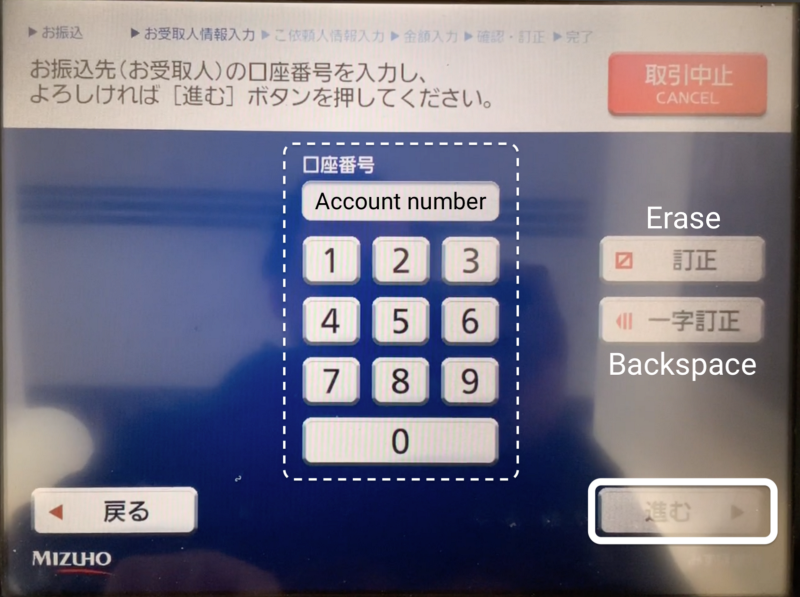
Step 12 — Enter the recipient’s account number
At this screen, you will be asked to enter the recipientʼs account number. You can use the erase and backspace buttons to correct any mistakes. Once the account number is correctly entered, press「進む」(Continue) to move on.
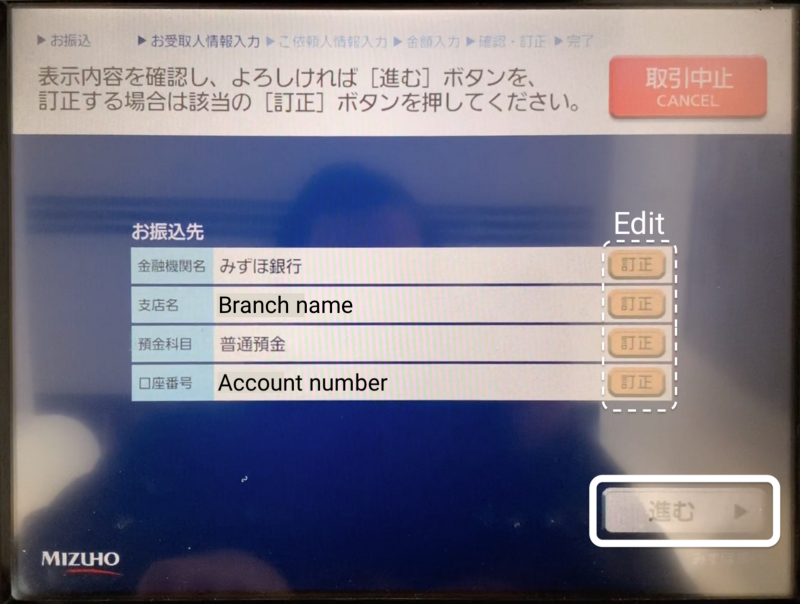
Step 13 — Confirm the recipient’s information
This screen will display the information you have entered. If anything does not appear correct, please press the corresponding orange「訂正」(Edit) button to fix the error. If the information is correct, please press「進む」 (Continue).
Step 14 — Enter your name
At this screen you will be asked to enter your name using katakana. Please feel free to do so and move on to Step 16. For the English alphabet, select the orange「英数字切替」 (Switch to alphabet/numbers) button to enter you name.
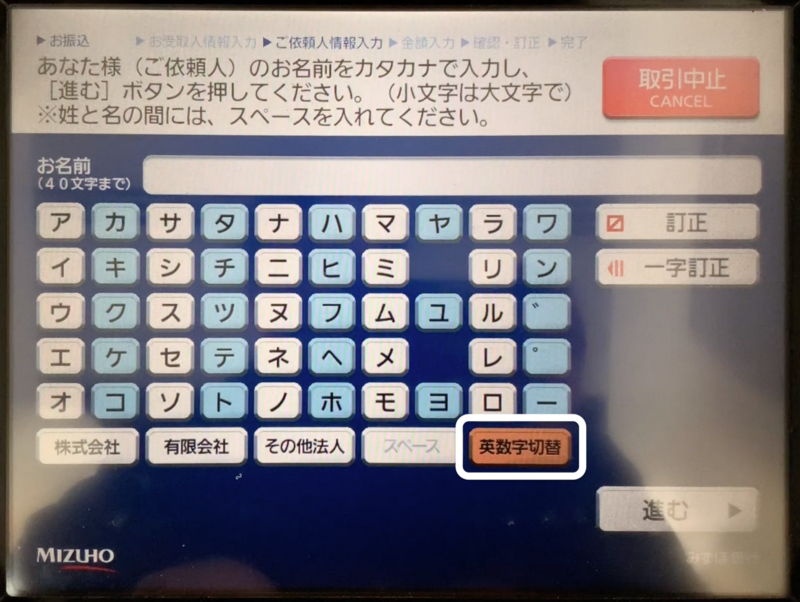
Step 15 — Enter your name
Please enter your name in accordance with your Oakhouse registration. No spaces are allowed, and all letters will be capitalized. Once you have entered your name, please press「進む」(Continue).

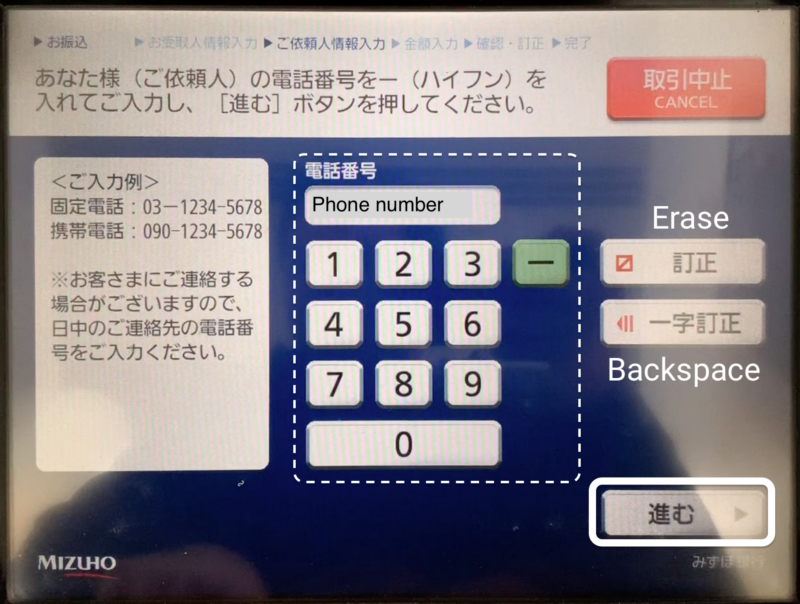
Step 16 — Enter your phone number
This screen will ask for your phone number, including hyphens. If you have a Japanese phone number, please enter it here. If you are participating in our program and do not have a Japanese phone number, please contact us and we can provide one for you to use. After entering the phone number, please press「進む」(Continue).
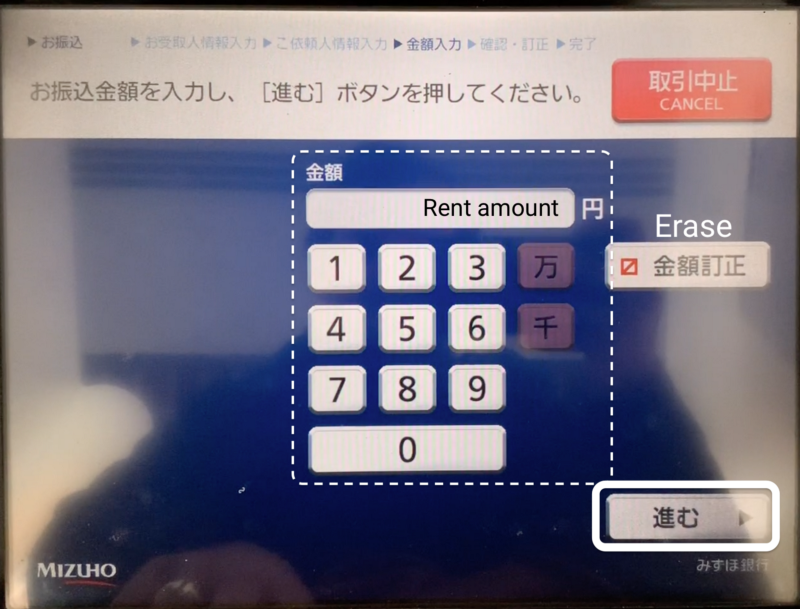
Step 17 — Enter the transfer amount
At this screen, please enter the amount requested by Oakhouse (i.e., rent, and/or any other applicable fees). Please note that a transfer fee will likely be charged in addition to this amount, and that you should have the cash ready to deposit. After entering the amount, please press「進む」(Continue).
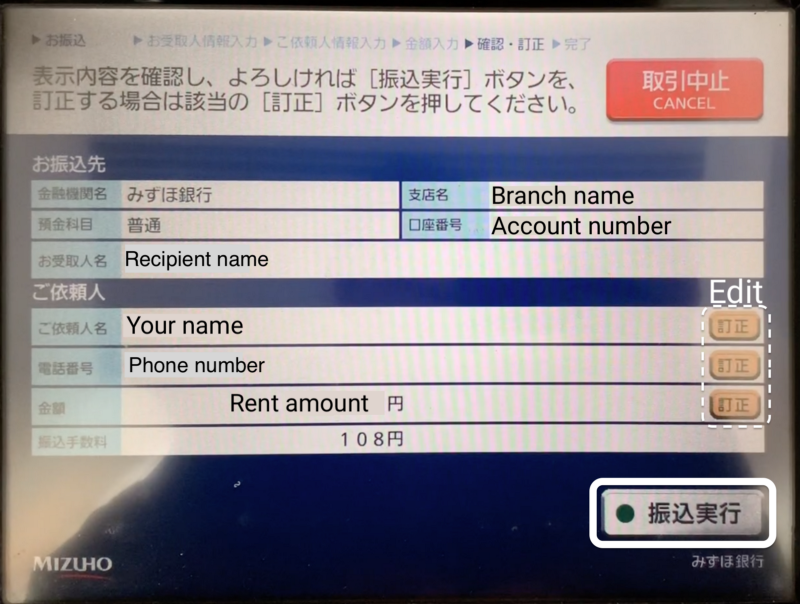
Step 18 — Submit the transfer
This screen will display all of the information that has been entered. Please check over the information to confirm that it has been entered correctly. Also note the sum of the various fees displayed below the transfer/rent amount. If everything appears correct, please press 「振込実行」(Execute transfer) to confirm and perform the transfer.
After this step you will be asked to deposit the cash necessary to complete the transfer. You may also be asked if you would like to have the receipt display the transfer amount. If desired, press「表示する」(Display), or if not, press「表示しない」(Do not display). After you take your receipt and take any leftover change (if applicable), youʼre all done!